
RESTful Web Services are basically REST Architecture based Web Services. In REST Architecture everything is a resource. RESTful web services are light weight, highly scalable and maintainable and are very commonly used to create APIs for web-based applications.
This tutorial will teach you how to create a simple login page using Angular JS and RESTful Web Services. For the backend, I have used Hibernate and Oracle DB. You can also use any other database like MySQL.
1. Create The Login Page
The first thing that you need to do is create the login page. Since Angular JS is used to create a single page application, let us create two html pages – index.html and login.html. The index.html will form the base for all the pages if you’re looking to add more pages. Here is the code for index.html.
<!doctype html>
<html ng-app="myApp" >
	<head>
	        <meta charset="utf-8" http-equiv="X-UA-Compatible" content="IE=9; IE=8; IE=7; IE=EDGE; IE=11">
		<title>REST Login Sample</title>
		<script>document.write('<base href="' + document.location + '" />');</script>
		<script src="lib/angular.js"></script>
		<script src="lib/angular-ui-router.min.js"></script>
		<link rel="stylesheet" href="https://maxcdn.bootstrapcdn.com/bootstrap/3.3.7/css/bootstrap.min.css">
		<script src="lib/jquery.min.js"></script>
		<script src="lib/bootstrap.min.js"></script>
		<!-- Angular Material style sheet -->
		<link rel="stylesheet" href="css/angular-material.min.css">
		<link rel="stylesheet" href="css/style.css">
		<!-- Angular Material requires Angular.js Libraries -->
  		<script src="lib/angular.min.js"></script>
  		<script src="lib/angular-animate.min.js"></script>
  		<script src="lib/angular-aria.min.js"></script>
  		<script src="lib/angular-messages.min.js"></script>
  		<!-- Angular Material Library -->
  		<script src="lib/angular-material.min.js"></script>
		<script src="js/app.js"></script>
		<script src="js/loginController.js"></script>
		<script src="lib/moment.js"></script>
		<script src="js/loginService.js"></script>
		<script src="lib/dirPagination.js"></script>
	</head>
	<body>
		<div class="container" style="background-color:#f9f9f9;">
			<div >
				<div class="row" style="background-color:#ffffff;">
					<div class="col-md-12" style="font-size: 30px;background-color:#7A1EA1;color: white;height: 65px;padding-top: 12px;font-family:Arial;">Login Page</div>
				</div>
			</div>
			<div ui-view style="margin-top:20px;"></div>
		</div>
	</body>
</html>
The next thing that you have to do is create login.html.
<div class="col-md-12">
	<p>
		<strong>Login Page</strong>
	</p>
	<form class="form">
		<div class="col-md-4">
			<div class="form-group">
				<input type="text" class="form-control" ng-model="login.username" placeholder="username" required="" />
			</div>
			<div class="form-group">
				<input type="password" class="form-control" ng-model="login.password" placeholder="password" required="" />
			</div>
			<div class="form-group">
				<button type="submit" ng-click="formSubmit()" class="btn">Login</button>
				<span class="text-danger" style="color: red">{{ error }}</span>
			</div>
		</div>
	</form>
</div>
Once, you have done the above, the next thing that you need to do is configure Angular modules. The first thing that you need to do is create app.js.
(function() {
	var app = angular.module('myApp', ['ui.router','ngMaterial', 'ngMessages','angularUtils.directives.dirPagination']);
	app.run(function($rootScope, $location, $state, LoginService) {
		console.clear();
		console.log('running');
		if(!LoginService.isAuthenticated()) {
			$state.transitionTo('login');
		}
	});
	app.config(['$stateProvider', '$urlRouterProvider',
		function($stateProvider, $urlRouterProvider) {
		$stateProvider
		.state('login', {
			url : 'login',
			templateUrl : 'login.html',
			controller : 'LoginController'
		})
		$urlRouterProvider.otherwise('/login');
	}]);
})();
2. Configure The RESTful Web Service
Once, you have created the app.js, you will have to create a js file for the LoginController. The LoginController js file will have the REST url which will be called.
var app = angular.module('myApp');
app.controller('LoginController', function($scope, $rootScope, $stateParams, $state,$http, LoginService) {
	console.log("login controller");
	$rootScope.title = "AngularJS Login Sample";
	$scope.formSubmit = function() {
		console.log($scope.login);
		var request = {
				method: 'POST',
				url: '/RESTLogin/rest/WebServiceResource/login',
				data : $scope.login,
				headers: {
					'Content-Type': 'application/json; charset=utf-8'
				}
		}
		$http(request)
		.success(function(d) {
			if(d != -1) {
				$rootScope.userName = $scope.login.username;
				$scope.error = 'Username and Password is valid';
				$scope.login.username = '';
				$scope.login.password = '';
			}
			else {
				$scope.error = 'Invalid username/password';
				$scope.login.username = '';
				$scope.login.password = '';
			}
		})
		.error(function(d) {
			$scope.error = "Unable to authenticate login credentials";
			$scope.login.username = '';
			$scope.login.password = '';
		});
	}
});
Next thing that you will need to is create a package and class in java that will be able to receive the REST call. Here is how I have created one.
Also remember, that to RESTful Web Service to work, you need to configure the web.xml so that your application is aware about your REST url and the Java class which will handle all the REST calls. Make sure you have the correct class in web.xml else the servlet will not work.
Here is how my web.xml looks like.
<?xml version="1.0" encoding="UTF-8"?>
<web-app xmlns:xsi="http://www.w3.org/2001/XMLSchema-instance" xmlns="http://java.sun.com/xml/ns/javaee" xsi:schemaLocation="http://java.sun.com/xml/ns/javaee http://java.sun.com/xml/ns/javaee/web-app_3_0.xsd" id="WebApp_ID" version="3.0">
  <display-name>RESTLogin</display-name>
  <servlet>
      <servlet-name>Jersey RESTful Application</servlet-name>
      <servlet-class>com.sun.jersey.spi.container.servlet.ServletContainer</servlet-class>
      <init-param>
         <param-name>com.sun.jersey.config.property.packages</param-name>
         <param-value>RestLoginWebServiceResource</param-value>
      </init-param>
   </servlet>
   <servlet-mapping>
      <servlet-name>Jersey RESTful Application</servlet-name>
      <url-pattern>/rest/*</url-pattern>
   </servlet-mapping>
</web-app>
When writing the class which will handle all your REST calls, make sure you add the @Path annotation, so that your Jersey API (REST API which I have used here) can determine the root class.
Here is the RestLoginWebServiceResource class which will handle the REST calls.
package RestLoginWebServiceResource;

import javax.ws.rs.Consumes;
import javax.ws.rs.POST;
import javax.ws.rs.Path;
import javax.ws.rs.core.MediaType;

import utils.Login;
import utils.LoginUserDetailsDAO;

@Path("/WebServiceResource")

public class RestLoginWebServiceResource {

	@POST
	@Path("/login")
	@Consumes(MediaType.APPLICATION_JSON)
	public int getLoginUser(Login login) {
		System.out.println("Username received : " + login.getUsername() + " , Password received : " + login.getPassword());
		int loginFlag = LoginUserDetailsDAO.getLoginUserInfo(login.getUsername(),login.getPassword());
		System.out.println("loginFlag : " + loginFlag);
		return loginFlag;
	}
}
3. Create A Pojo And DAO Class
Now that you have created the class to handle the REST calls, you will need to create a Pojo class for hibernate and a DAO class to validate the user credentials.
package utils;

public class Login {

	private String username;
	private String password;

	public String getUsername() {
		return username;
	}
	public void setUsername(String username) {
		this.username = username;
	}
	public String getPassword() {
		return password;
	}
	public void setPassword(String password) {
		this.password = password;
	}

}
Below is how the DAO class will look like which is used to validate the user credentials.
package utils;

import java.util.List;

import org.hibernate.Criteria;
import org.hibernate.SQLQuery;
import org.hibernate.Session;
import org.hibernate.SessionFactory;
import org.hibernate.Transaction;

public class LoginUserDetailsDAO {

	private static final String loginSQL = "SELECT username,password FROM login "
			+ "WHERE username = :USERNAME AND password = :PASSWORD";

	public static int getLoginUserInfo(String username, String password){
		int loginFlag = -1;
		SessionFactory sessionFactory = HibernateUtil.getSessionFactory();
		Session session = sessionFactory.openSession();
		try {
			SQLQuery query = session.createSQLQuery(loginSQL);
			query.setParameter("USERNAME", username);
			query.setParameter("PASSWORD", password);
			query.setResultTransformer(Criteria.ALIAS_TO_ENTITY_MAP);
			List queryResult = query.list();
			if (queryResult != null && !queryResult.isEmpty()) {
				loginFlag = 1;
			}

		}
		catch(Exception e) {
			e.printStackTrace();
		}
		finally {
			if(session.isOpen())
				session.close();
		}
		return loginFlag;
	}


}
4. Configure Hibernate
To configure Hibernate, you need to have a hibernate.cfg.xml. Since I have used a local Oracle DB, here’s how it looks.
<?xml version="1.0" encoding="UTF-8"?>
<!DOCTYPE hibernate-configuration PUBLIC
"-//Hibernate/Hibernate Configuration DTD 3.0//EN"
"http://www.hibernate.org/dtd/hibernate-configuration-3.0.dtd">

<hibernate-configuration>
	<session-factory>
		<property name="connection.driver_class">oracle.jdbc.driver.OracleDriver</property>
		<property name="hibernate.dialect">org.hibernate.dialect.Oracle10gDialect</property>
        <property name="hibernate.connection.url">jdbc:oracle:thin:@(DESCRIPTION_LIST=(DESCRIPTION=(ADDRESS_LIST=(ADDRESS=(PROTOCOL=TCP)(HOST=localhost)(PORT=1521)))(CONNECT_DATA=(SERVICE_NAME=XE))))</property>
        <property name="hibernate.connection.username">SYSTEM</property>
        <property name="hibernate.connection.password">admin</property>
        <property name="show_sql">true</property>
        <property name="hbm2ddl.auto">update</property>
	</session-factory>
</hibernate-configuration>
You will also need to have a class which will create the Hibernate SessionFactory so that it can be used to connect to the DB.
package utils;
import org.hibernate.SessionFactory;
import org.hibernate.cfg.Configuration;
public class HibernateUtil
{
private static final SessionFactory sessionFactory = buildSessionFactory();
@SuppressWarnings("deprecation")
private static SessionFactory buildSessionFactory() {
try {
return new Configuration().configure().buildSessionFactory();
}
catch (Throwable ex) {
System.err.println("Initial SessionFactory creation failed." + ex);
throw new ExceptionInInitializerError(ex);
}
}
public static SessionFactory getSessionFactory() {
return sessionFactory;
}
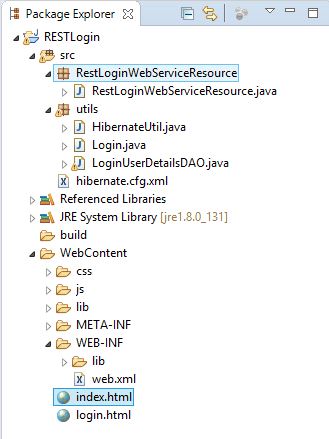
}If you’re curious about how the project structure looks like it will be something like this.
So, that’s it for this tutorial. If you’re interested, you can download the project from this link.
Have already used Angular JS with RESTful Web Service ? You can share your views in the comments below.
